Use automated WIP relief for WIP asset balances
Related information
Facilitate easy matching of revenues and expenses via automated movement to cost of goods sold, expense, or asset account types. This enhancement is designed to streamline your accounting processes and improve the accuracy of your financial reporting for long-running projects.
Automated WIP relief ensures that assets are booked to WIP accounts, then automatically moved when cost is incurred into an asset account. This can be done when revenue is recognized.
By aligning costs with revenue, this automation provides a more accurate picture of your company's financial health. Automated WIP relief adheres to the matching principle, ensuring that costs are recognized in the Profit & Loss (P&L) statement only when the corresponding revenue is recognized.
| Subscription |
Projects:
Grants:
|
|---|---|
| Regional availability |
|
| User type |
Business Construction Manager Project Manager Employee |
| Permissions |
Projects
Business and Project Manager can use all permissions. Employee users can view or list only. |
| Restrictions |
For use with Contract accounting. Not available for Construction, which uses a different WIP Management process. |
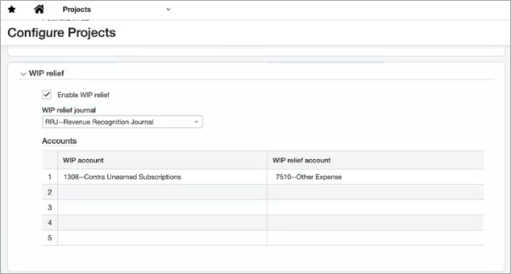
Configure WIP relief in Projects
-
Go to Projects> Setup> Configuration.
-
In the new WIP relief section:
- Select the Enable WIP relief checkbox.
- Select the WIP relief journal.
This must be an "account only" journal. - Enter the WIP account and the WIP relief account.
- WIP account must be a balance sheet account with a normal debit balance that is non closing.
- WIP relief account must be an account with a normal debit balance.
Enabling WIP relief triggers the ability to grant permission to generate or view WIP relief.
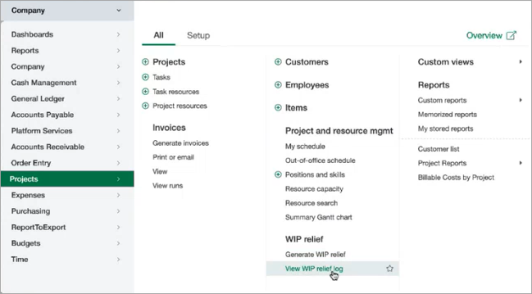
Now, the Projects menu includes a two new options: Generate WIP relief and View WIP relief log.
Grant permission to generate
After you’ve enabled WIP relief, grant permission for each user you want to be able to generate the WIP relief.
- From the Company menu, select the user or role that you want to grant permission.
-
In the Projects line, select Permissions.
-
Scroll to WIP relief and select List, View, Generate, and/or Delete.
- Repeat this for each user or role to grant permissions to generate or view WIP relief.
Users and roles with these permissions now can generate or view WIP relief.
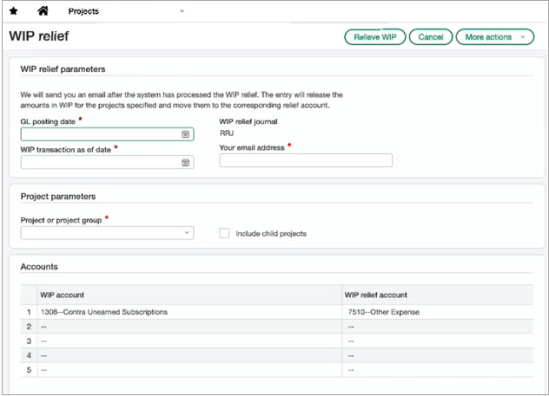
Generate WIP relief
Next, generate the WIP relief
-
Go to Projects > All > Generate WIP relief.
-
Set the WIP relief parameters to provide all the information needed:
- GL posting date
- WIP transaction as of date
- Your email address
- The project or project group (include child projects, if needed)
- Select the Relieve WIP button to start the process.
- Intacct then takes the information and creates the WIP relief entry. The entry is generated offline, and an email is sent when the entry is complete.
View WIP relief log
After WIP relief is generated, go to the WIP relief journal to review the entry or access it from the WIP relief log. If the journal entry requires approvals, the entry will go through the approval cycle.
Select View WIP relief log from the Projects > All menu to see a list of each WIP relief generation, including the Run date and time, who was emailed, and the status. You can drill into each entry to view a snapshot of the relief parameters.